News
TRX Going Digital
TRX is turning over a new leaf this Fall by making the switch to Digital Manuals. Our Education Journey (STC, FTC, GTC, and RTC) are all going digital. This will enable participants to digitally interact with our education manuals, as well making our manuals more portable and easily accessible. They will be delivered to participants via their TRX MyLocker Accounts. Participants in the soft launch window, August 22nd through September 30th 2015, will receive both a hard and digital copy of the manual. Beginning October 1st 2015, all Education Journey courses will completely switch to 100% digital. Please refer to our FAQ's below and online for more details. If you have any specific questions you can contact our Customer Service team.
Cheers,
TRX Education & Training Team
TAKE OUR TRAINING QUIZ
TRX Education Course Digital Manuals FAQ’s
How will I receive my Digital Manual?
Once you sign up for a TRX Education Course, you will receive a confirmation email with a token code to redeem your Digital Manual via your MyLocker account.
Do I have to create a MyLocker account in order to redeem my Digital Manual?
Yes. You’re Digital Manual will live in your MyLocker account; from there it is recommended you download your Digital Manual to your electronic device prior to arriving to your course.
Your digital manual can be downloaded and saved onto your electronic devices for future use.
Will I also receive a hard copy manual at the course?
All courses between Aug. 15th - Oct. 1st 2015 will receive BOTH a hard and digital copy of the manual.
All courses AFTER Oct. 1st 2015 will receive a digital copy ONLY.
What If I want a hard copy manual? Can I purchase a hard copy manual separately?
Unfortunately, we don’t sell a hard copy separately. However, should you want a hard copy to take notes on, it is advisable to print your manual ahead of time and/or bring a notebook to the course.
What format do the Digital Manuals come in and what devices are compatible?
Digital Manuals are in a PDF format so any laptop, mobile device, and tablet that supports PDF files are compatible with our Digital Manuals. It is recommended, but not necessary, that you download and view using Adobe Acrobat (computer) or Adobe Acrobat Reader App (mobile/tablet).
Can I take notes on my Digital Manual?
TRX’s Digital Manuals have editable text fields to take notes on via your electronic devices. It is recommended, but not necessary, that you download and view using Adobe Acrobat (computer) or Adobe Acrobat Reader App (mobile/tablet).
TRX Hamstring Circuit
I like incorporating this TRX hamstring circuit into my training regimen on a regular basis, especially when my body needs a break from the usual hamstring culprits that many are used to relying on; RDL's, Single Leg RDL's, Hamstring Curls, Glute Ham Raises, and Eccentric Hamstring Drops. Want to know which hamstring exercises best match your current strength level? Take our quick fitness assessment quiz for personalized recommendations.
All of these exercises are great for increasing strength, but it's good to try something new. With the TRX Suspension Trainer, it's always easy to freshen up your training while improving your quality of movement and keeping your overall workout efficiency and effectiveness at a high level.
TAKE OUR TRAINING QUIZ
The Exercises
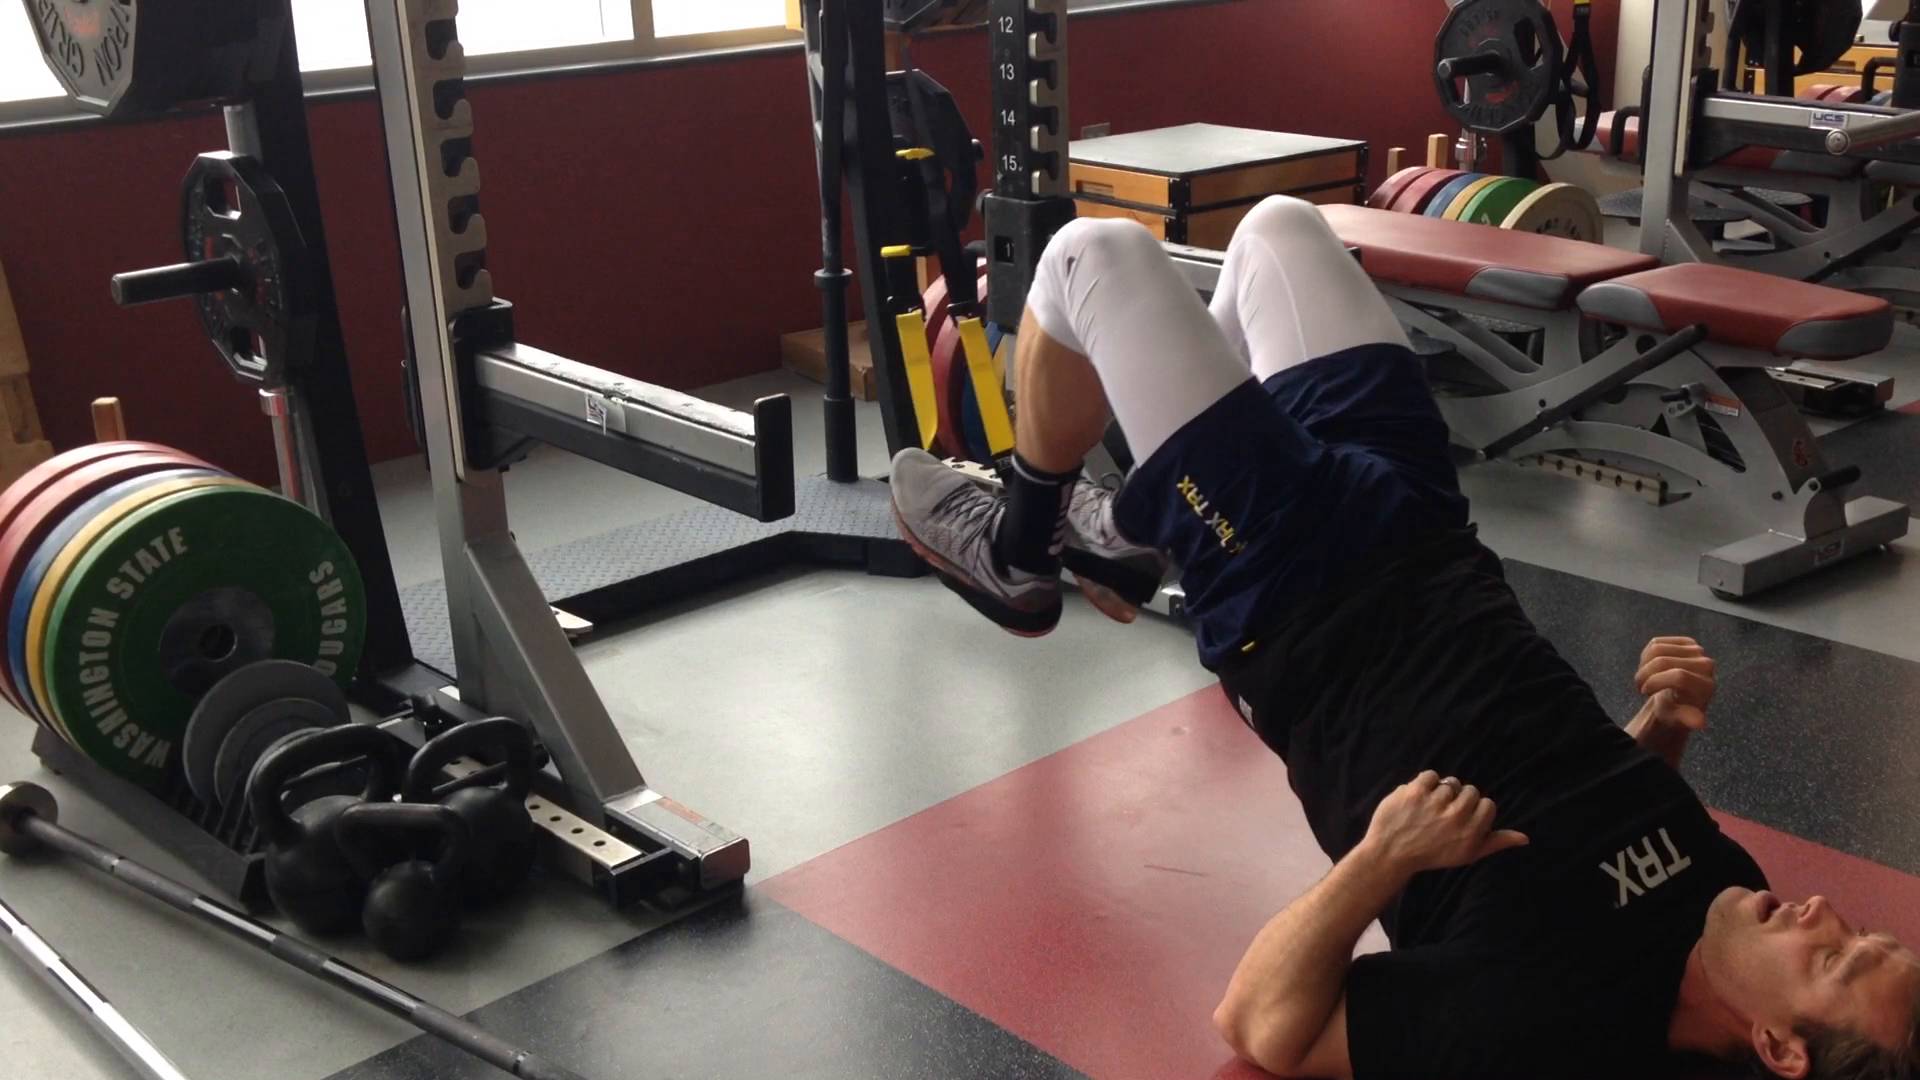
1. Hamstring Hold x10 seconds
*Position your heels in the foot cradles of the TRX. Legs are straight, triceps and elbows are flush with the ground and can provide stability, slowly press heels into straps, slowly raising lower body off the ground, and hold in a straight line.
2. Hamstring Curls x10
*Heels stay in the foot cradles of the TRX, triceps and elbows are still flush with the ground and can add stability as you slowly elevate lower body, and bring heels under your glutes. Important to keep hips extended throughout the movement, this will help to really isolate your hamstrings.
3. Hip Thrusts x10
*Place balls of feet in the foot cradles of the Suspension Trainer, knees are bent at 90 degrees, press feet into straps, raising hips up and down, focusing on the high hamstring (where the hamstring meets the glute).
Give this hamstring circuit a try at the end of your next leg day, and smoke those hamstrings!
Coach Thom- Create a great day!
If you don't have a suspension trainer, pick one up today.
TRX® PRO4 SYSTEM
BUY NOW
TRX® HOME2 SYSTEM
BUY NOW
TRX® TACTICAL GYM
BUY NOW
Scott Thom recently completed his second season with the Washington State University men’s basketball program as the team’s strength and conditioning coach/player development, after serving in the same capacity at California the previous four years. Prior to joining the staff at California, Scott coached basketball and taught physical education for seven years at Vintage High School in Napa, Calif. Scott received his bachelor’s degree in physical education from Chico State in 2002, a teaching credential in physical education from Sonoma State, and a masters in Coaching and Athletic Administration from Concordia University. He is certified though both CSCS and USAW. Scott writes articles for STACK and Harbinger Fitness.
TRX Glute Exercises
Learn to activate your glutes with the TRX Suspension Trainer to help you run, jump, sit and move better. Your glutes are among the most important muscles in your body. If you’re a runner, they give you stability. If you’re a volleyball player, they give you power. Even if you’re just walking down the street, you need functional gluteal muscles to keep your pelvis in line. When these muscles are not firing properly, your body is unable to perform at its optimal capacity and is susceptible to injury.
While many factors can lead to faulty glutes, tight hip flexors are the most common culprit. Want to find exercises that target your specific mobility needs? Take our quick assessment quiz to get a personalized plan for activating your glutes and releasing tight hip flexors. When you sit for long periods of time, your hip flexors become shorter and tighter. Your hip flexors act as an antagonist to your glutes, which means it is impossible to activate both muscles at the same time. Thus, tight, overactive hip flexors prevent your glutes from doing their job, and other muscles, such as the hamstrings and low back, are forced to take over.
TAKE OUR TRAINING QUIZ
We can optimize the function of our glutes by working to increase the natural loading of the muscle group. How? By using other parts of our body as “drivers” during traditional glute exercises to accentuate the load and force the proprioceptors to turn the glute muscles on.
Let’s look at the lunge. If we are trying to accentuate glute loading, we can achieve this by adding a multidirectional reach. This reach drives the pelvis to rotate forward, increasing hip flexion. This action also increases the stretch or loading of the glutes and causes them to forcefully and eccentrically decelerate the movement, which also results in a more forceful explosion out of the lunge with reach position.
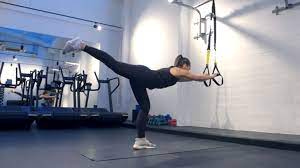
In the video above, TRX Senior Master Instructor Susane Pata shows us several traditional glute exercises with varying drivers that are effective in not only activating the target areas but also in increasing range of motion, strength and balance. Be sure to start with a single set and light load before progressing. You can increase loading further by adding resistance such as a medicine ball or light dumbbells. Perform 10 to 12 reps of each exercise.
Lunge with Forward Reach
Lunge with Side Reach
TRX Crossing Balance Lunge
Lunge with Rotational Reach
Deep Squat
Squat with Side Reach
Squat with Rotational Reach
Remember, our butts are there for a reason. They stabilize the hips and assist in various hip and leg movements. Without proper function, you run into pain, dysfunction or injury that will ultimately affect your movement in sport and life.
In her role as TRX Senior Master Instructor, Susane Pata travels the world teaching TRX Professional Education Courses and assists with the development and training of new course instructors. She has been involved with TRX since the company's inception and played an integral role in creating the Group Suspension Training Course we currently teach today. Susane is currently pursuing a doctorate degree in Physical Therapy.
TRX Functional Training Workout - Hinge Circuit
Coach Miguel here, and I want to take the time to explain why I love to use the TRX® Suspension TrainerTM to “set the standard” on any of our TRX® Foundational movements. Today, and over the next few weeks we are going to challenge many of your favorite SUSPENSION TRAINING® exercises, and then change the conditions to challenge your movement, using our new line of TRX® Functional Training Tools.
This circuit workout has an emphasis on the hinge, one of the TRX Foundational Movements. The key to having a successful hinge is to be sure you have maximal hip flexion, with minimal knee flexion.
As you progress through this circuit I want you to focus on being explosive from the hips. Now, that doesn’t mean you increase the speed of the movement and hope for a miracle it all works out, rather, with each exercise the aim should be to build on the previous, allowing you to train the hip hinge and be deliberate with what we at TRX refer to as, “what right looks like, and what right feels like”.
One more piece of advice to keep in mind as you go through this workout: whether the movement is focused on mobility, flexibility, strength or speed, remember to always “Chase Your Plank”. This means keep a strong plank as your foundation to all movements!
While performing the workout, remember the following:
Complete each exercise for 40 seconds and rest for 20 seconds.
Begin at the station 1
Repeat each station four times before moving on to the next station.
TRX® Functional Training Workout – Hinge Circuit
Station 1: TRX® Hamstring Curl (with Mini Band)
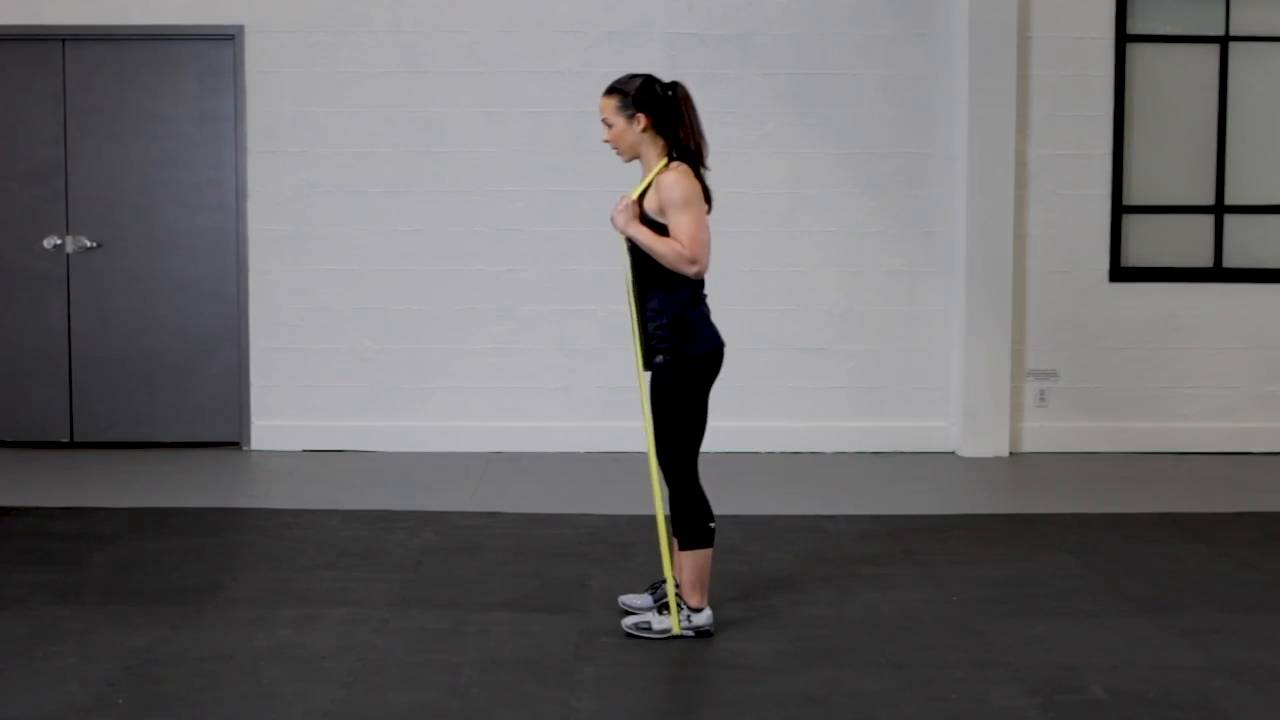
Station 2: Strength Band Good Mornings
Station 3: Strength Band Pull Up on Bar*
Station 4: Slam Balls- Heavy Slams
Try this out, and check back in with us for more workouts!
* Be sure to have careful placement of the Strength Band below the cervical spine, the tension of the band should be placed across the uppers traps, and not pulling on the spine and surround musculature.
Miguel Vargas eats, sleeps, and breathes all things TRX®. Suspension Training® has become his passion over the past 4 years and has helped him excel in swimming, cycling, and natural bodybuilding. As a TRX coach, his only goal is to deliver exciting, challenging, and safe classes at the TRX Training Center. When he's not teaching, he works at TRX Headquarter as the Training & Development Manager, creating new content and Instructing TRX Educational Course to Coaches across North America.
TRX Functional Training Workout – Core Stability Circuit
Welcome back to your next TRX® Functional Training Workout. Today's workout isn't just about having strong arms. You have to bring the whole package of balance, core stability, and strength to the party! Core stability is key in every movement during this tough Functional Training Tools circuit. Before starting, take our quick form assessment quiz for customized tips on maintaining proper alignment throughout these exercises.
TAKE OUR TRAINING QUIZ
SOME TRX® TIPS: This circuit has a station that uses Conditioning Ropes. Make sure that the following two things are checked off before you attack those ropes:
Your core is turned on
Fire up your glutes and mobilize your shoulders prior to starting
We categorize many Conditioning Rope Exercises as a Pull. What does this mean exactly? Well, you need to focus on “pulling” the rope in a rhythmical fashion vs. slamming the rope until you’re blue in the face, all the while hoping for that beautiful wave-like motion we all strive for.
Movement standards of a pull are; active plank, with the movement being driven from the shoulders and elbows.
These four stations are going to challenge you in varied planes of motion forcing you to dial-in to what we like to say, “What should be mobile and what should be stable”.
Remember:
Complete each exercise for 40 seconds and rest for 20 seconds
Begin at station 1
Repeat each station four times before moving on to the next station
TRX® Functional Training Workout – Core Stability Circuit
Station 1: Stability Ball Stir the Pot
Station 2: Mini-Band Squat (Band around knees)
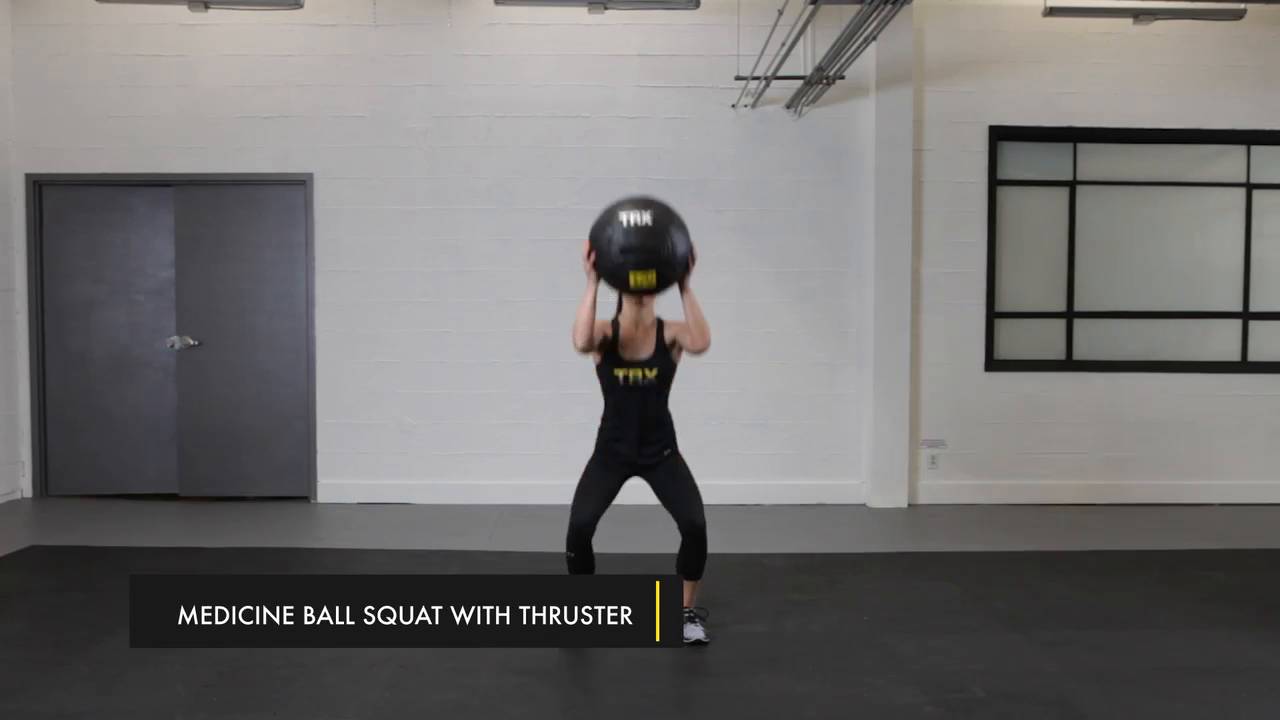
Station 3: Medicine Ball Squat with Thruster
Station 4: Conditioning Rope- Step Back lunge with Alt. Waves
Miguel Vargas eats, sleeps, and breathes all things TRX®. Suspension Training® has become his passion over the past 4 years and has helped him excel in swimming, cycling, and natural bodybuilding. As a TRX coach, his only goal is to deliver exciting, challenging, and safe classes at the TRX Training Center. When he's not teaching, he works at TRX Headquarter as the Training & Development Manager, creating new content and Instructing TRX Educational Course to Coaches across North America.
TRX Functional Training Tools - Build Yourself your Dream Home Gym
Have you ever considered building a home gym? Think your only option is to invest in a treadmill or spin bike that can be placed in the corner of your living room?
The new line of TRX Functional Training Tools combined with the TRX Suspension Trainer provide a low cost and low space investment to bring you an endless variety of killer workouts to your home.
BUILDING YOUR TRX TRAINING HOME GYM
STEP 1- Choose the best TRX Suspension Trainer for you
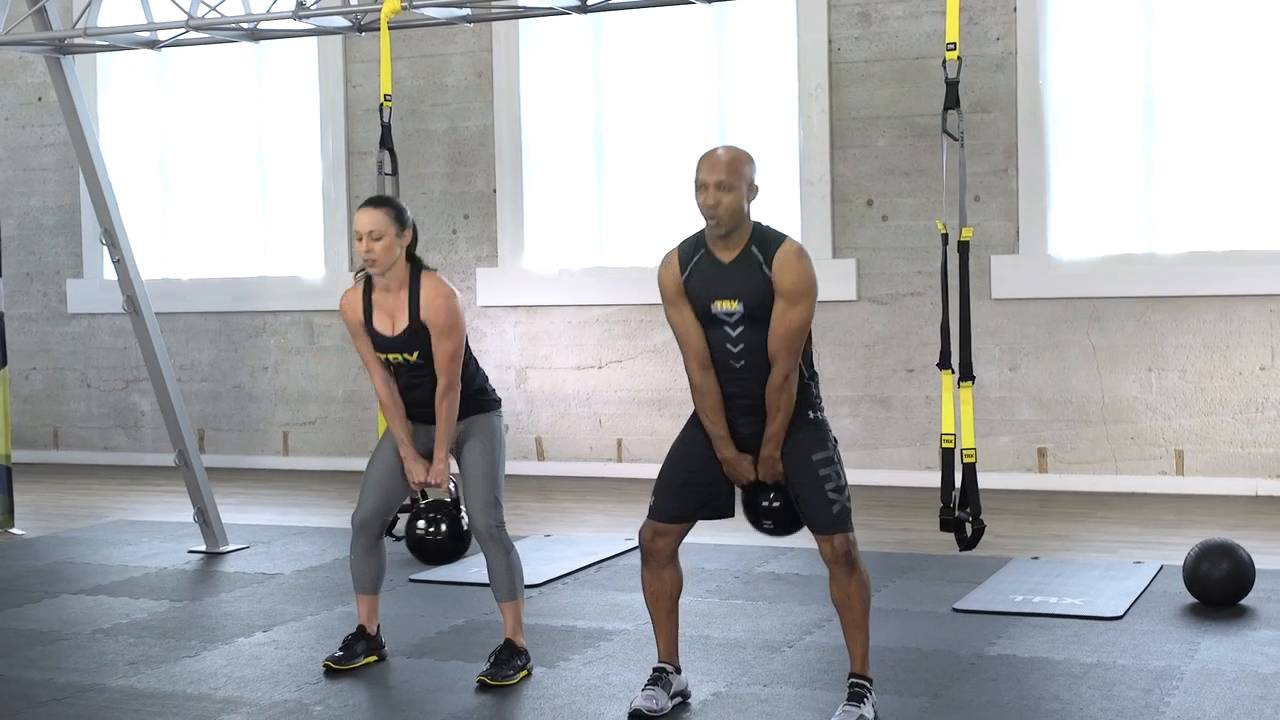
STEP 2- Couple that with some external weight(s) with either the TRX Medicine Ball, TRX Slam Ball and/or the TRX Kettlebells for an added challenge to almost any bodyweight exercise.
STEP 3- Mix in some conditioning exercises with the TRX Conditioning Rope- or challenge your favorite exercise with the added resistance of the TRX Strength Bands (also great for mobility exercises)
STEP 4- Finish your workout with some core work on the TRX Stability Ball or relax those tired muscles with some rolling on the TRX Foam Roller.
Select the TRX Functional Training Tools that best suit you- combine it with your TRX Suspension Trainer and you have yourself endless possibilities for workouts.
NOW Get Ready to Sweat.
---------------------------------
Try out this below circuit, and then experiment on your own.
4 Exercises, 30 seconds Work, 30 seconds rest.
1)TRX Mountain Climbers
2)TRX Strength Band High Knees
3)TRX Conditioning Rope Alternating Waves
4)TRX Medicine Ball or TRX Slam Ball Slams
Repeat this circuit four times.
Finish this workout by using the TRX Foam Roller to roll through your calves, quads, glutes and back.
--------------------------------
Make Your Body Your Machine with the TRX Suspension Trainer and any combination of the TRX Functional Training Tools to get a killer workout in the convenience of your home, on your own schedule.
TRX FORCE Kit Contents
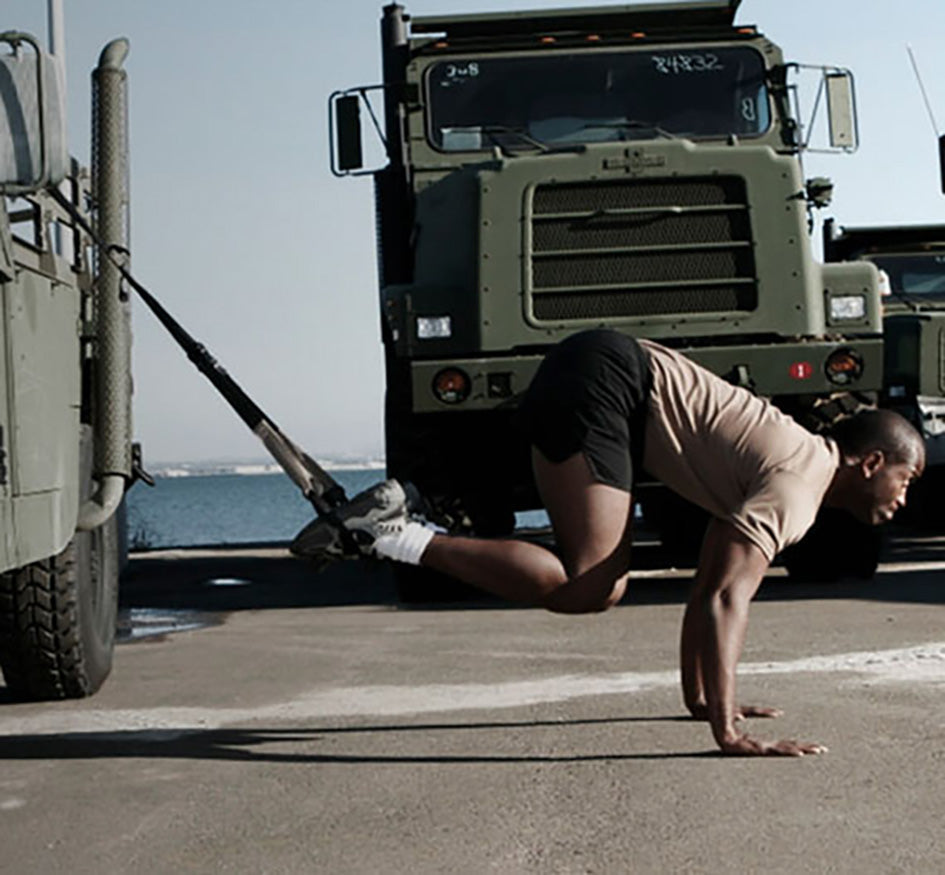
With the release of the new TRX FORCE Kit: Tactical, we thought you might want to know exactly how it differs from the previous TRX FORCE Kit. Want to find the right tactical training program for your unit? Take our quick assessment quiz to get personalized recommendations based on your mission needs. As Alex Roodhouse, TRX Director of Military Programs, points out in the video above, the TRX FORCE Kit: Tactical is our most sophisticated product to date, developed out of seven years of best practice research working with users in every branch of the military.
TAKE OUR TRAINING QUIZ
It contains the new 12 week progressive Tactical Conditioning Program, designed to build more durable and higher performing tactical athletes with an emphasis on operational readiness. The program is delivered with an easy to follow guide made from tear proof waterproof paper including four detailed exercise maps clearly illustrating each movement, as well as two DVDs with: three real-time workouts, agility drills and benchmarking challenges and a comprehensive video exercise library. The program is built on periodic built in benchmarking tests allowing users to easily track their progress.
In addition to the new Tactical Conditioning Program, the new TRX Tactical Suspension Trainer was designed around the feedback we received from military, first responders and tactical athletes using TRX in the field. Weighing in at a lean 1.5 pounds, we moved away from using the heavier cam buckles to lighter, easy to use D-rings. We upped the durability, by using textured rubber handles instead of the foam grips used on the previous model, which are both easier to grip and clean.
The new Kit also comes with a TRX Xtender Strap for higher anchor points and more vertical anchor points. This is an incredible resource for use in the field because it instantly adds a ton of potential anchor points. The new TRX FORCE Kit: Tactical comes in a durable, light weight mesh running bag made of ripstop nylon mesh and easily carries the entire system. The mesh running bag can be worn as a backpack and also includes several interior and exterior pockets for gear, ID, phone or whatever your mission demands.
UPDATE: In 2013, we launched the TRX FORCE Super App--the ultra-enhanced, digital 12-week Tactical Conditioning Program accessible anywhere on your Smartphone. It comes with your purchase of the TRX FORCE Kit: Tactical.
Buy your TRX FORCE Kit: Tactical now.
TRX for Yoga: TRX Dancer
The TRX Suspension Trainer provides an excellent tool to scale, complement and improve your yoga practice. We’ve partnered with yoga and fitness instructor, and Under Armour Athlete Shauna Harrison to show you how to incorporate the straps into your yoga.
The Dancer Pose (Lord of the Dance Pose) is an elegant pose that requires balance and flexibility. Let the TRX Suspension Trainer assist you with your balance as you use the straps to go deeper into the pose and increase your flexibility. Following this sequence will transform you into a graceful dancer in no time.
Progression 1
Adjust your straps to mid-length, and begin this progression (TRX Low Lunge) facing away from your anchor point. Place one foot into the foot cradle with the knee on the floor. The opposite foot should be placed in front of you with your knee bent. Carefully place your hands onto the front thigh, and adjust the hips so they face forward. Alignment here is key. If available, you can bend the back knee and reach the same hand back to grab either the straps or the handle. To come out of the pose, carefully release the straps and take the suspended foot out of the foot cradles.
Progression 2
In this progression, place yourself so you are standing in front of the straps with one foot into both foot cradles. Bend the back knee and reach the same hand for the straps. Keep the chest lifted and try not to dump all the weight forward. Use the straps to continue lifting the foot up. Grab the handles to deepen the stretch. Reach the opposite hand forward. To release, carefully return the foot down and remove it from the foot cradles.
Progression 3
From progression 2, reach back with the opposite hand to grab onto the straps. Place your hands along the straps so that they are right next to each other. As you ground through the standing leg, begin to walk the hands down closer to the foot as your flexibility allows. Press the foot into the straps as you create strap-tension by pulling with the hands either in the handles or further up on the straps. Maintain a lifted chest. To unwind, carefully return the foot down to the earth and remove it from the foot cradles. Use the hands on the straps to assist if necessary.
TRX for HandstandTRX for Yoga Warrior IITRX for Eka Pada Koundiyasana 2TRX for DancerTRX for Crow PoseTRX for BackbendsTRX for HeadstandsTRX for Warrior ThreeFor more ways to incorporate TRX into your yoga practice, try our TRX Yoga Fusion Workout.

TRX for Yoga: TRX Handstand
The TRX Suspension Trainer provides an excellent tool to scale, complement and improve your yoga practice. We’ve partnered with yoga and fitness instructor, and Under Armour Athlete Shauna Harrison to guide you in incorporating the straps into your yoga.
For most people, inverted poses can be challenging and intimidating. Want to find safe progressions for learning inversions? Take our quick assessment quiz to get a personalized training plan for mastering handstands. Similar to using a wall or partner to assist you into an inverted pose, the TRX Suspension Trainer can serve as a great tool to help you to slide into an inversion and feel confident along the way. By using the following sequence built just for you, there is no doubt you will easily lift into a handstand both independently and for good!
TAKE OUR TRAINING QUIZ
Progression 1
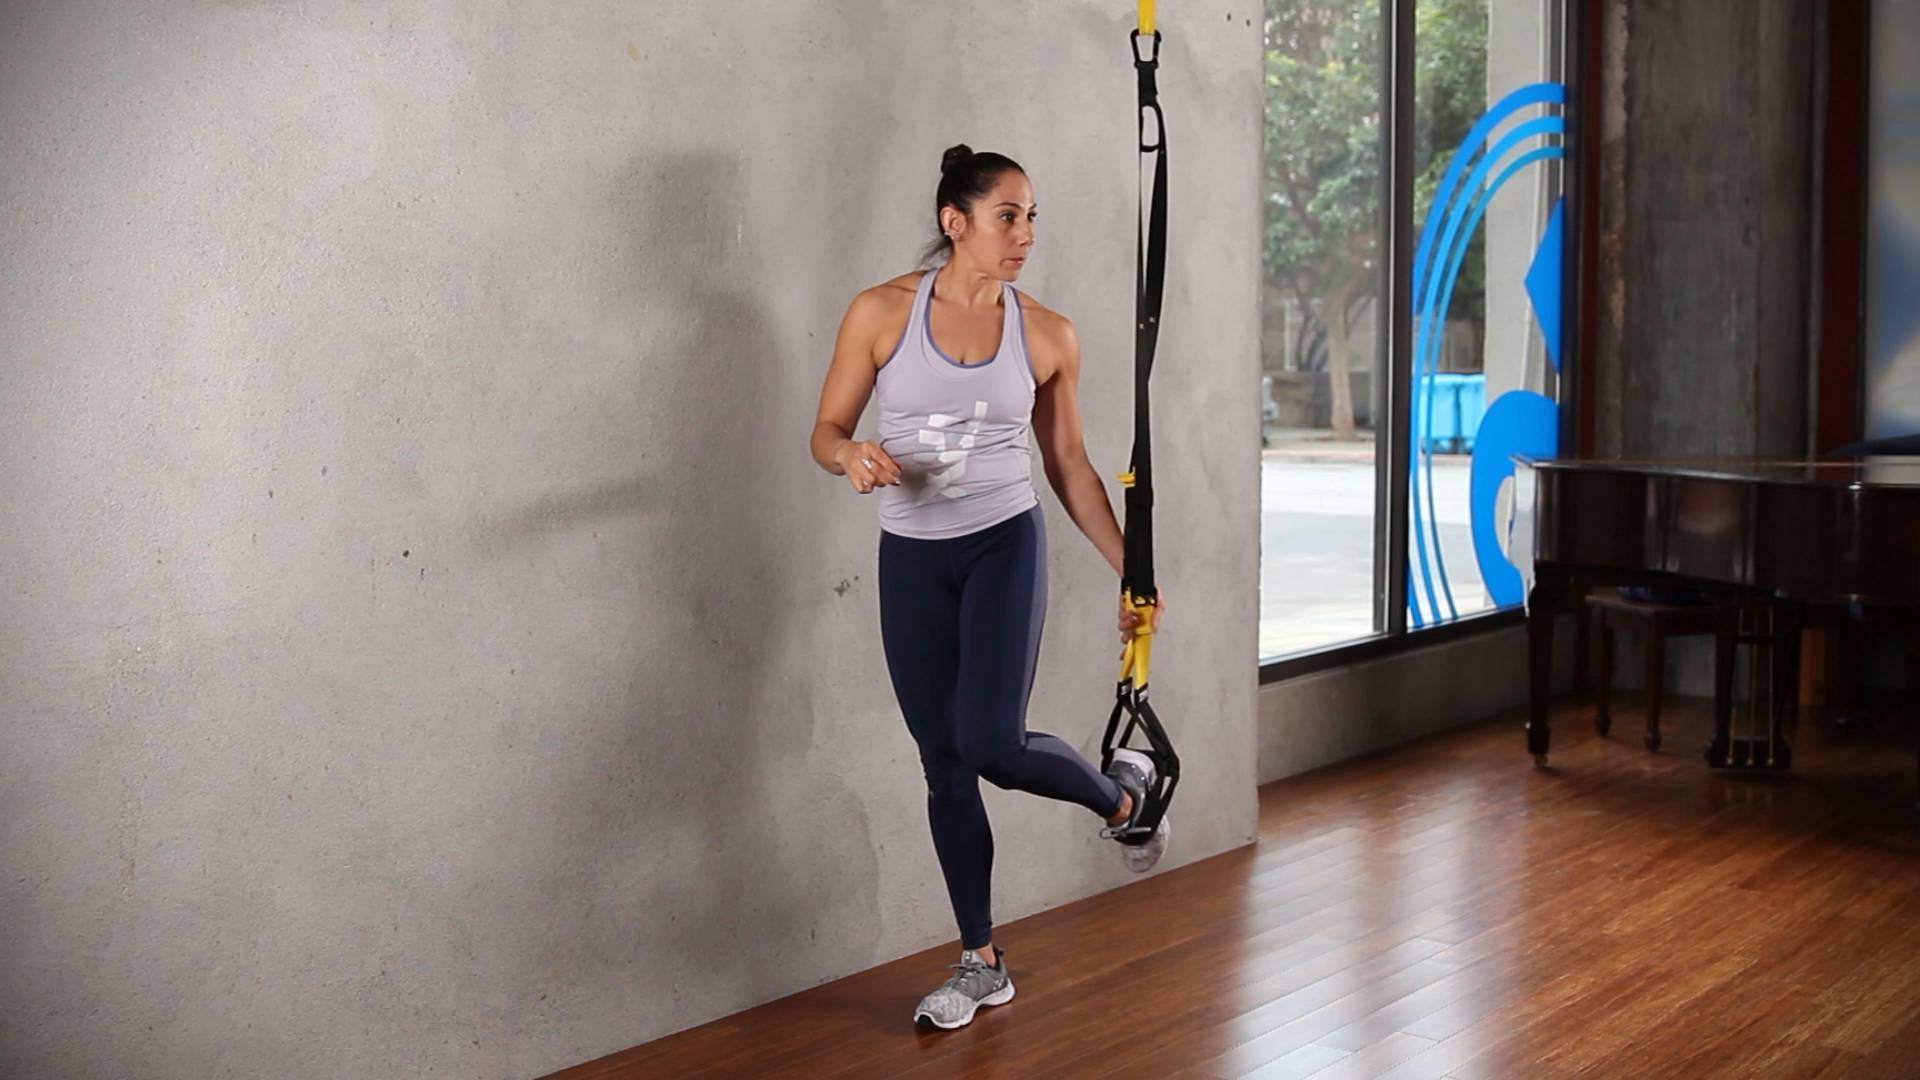
This is also called a TRX Standing Split. Stand facing away from the anchor point with one foot in both foot cradles. Slowly lower your hands to the ground in front of you. You should more or less be on all fours now as you walk yourself back and slowly transition into what will begin to resemble a 3-legged Downward Facing Dog.
Continue to walk your hands toward the back of the room as you play with taking the non-suspended leg off the ground and reach it toward the sky. The leg that is suspended in the Suspension Trainer extends further toward the ceiling. The farther back you walk, the more intense and necessary the core activation becomes. You progress by walking your hands as far back as you can. If you get to this point, rest assured your arms will get worked!
To release out of the pose, slowly walk your hands and the non-suspended leg forward towards the anchor. Once there, carefully bring the extended leg back down to the earth and make your way back on all fours. Once stable, remove the foot from the cradles.
Progression 2
Starting from the TRX Standing Split, press your hands strongly into the floor and drive the back heel forcefully into the foot cradles to bring the non-suspended foot off the floor. Bend the free leg and bring the knee to the chest. Drive the suspended-heel strongly into the foot cradles. Squeeze the belly-button into the spine to engage the core.
To come out of the progression, release the non-suspended leg back down to the ground. Slowly begin to walk the hands and the free leg forward towards the anchor. This will put you back on all fours. After you regain stability, remove the foot cradles.
Progression 3
From progression 2, try lifting the non-suspended leg towards the suspended leg. Keep tension on the straps. Engage the core, continue to press the hands firmly into the earth. Hold for 2-3 three breaths. To come out of the pose, slowly lower the non-suspended leg back down to the ground. Carefully begin to walk the hands and the non-suspended leg forwards towards the anchor. Carefully remove the foot cradles.
TRX for HandstandTRX for Yoga Warrior IITRX for Eka Pada Koundiyasana 2TRX for DancerTRX for Crow PoseTRX for BackbendsTRX for HeadstandsTRX for Warrior ThreeFor more ways to incorporate TRX into your yoga practice, try our TRX Yoga Fusion Workout.