News
TRX Ski Conditioning Workout: Part 1
As storms lay blankets of powder on ski resorts across the northern hemisphere, say adios to autumn and get ready to hit the slopes. But before you drift into daydreams of wowing the folks on the lift with your supreme mogul technique or your jibbing skills in the terrain park, take a moment to think about what kind of season you want to have. Want to find the perfect pre-season training plan for your winter sports goals? Take our quick assessment quiz to get a customized workout program that'll get you slope-ready. Do you want to be in dynamite condition, ready for another charge down the hill? Do you want to make it through the season with your knees intact? Then you've come to the right place. Whether you snowboard or ski, rock at a green or double diamond level, training on the TRX can help you reach your best this season. The goals of your winter sports TRX training will be two-fold:
TAKE OUR TRAINING QUIZ
Train your body into the best condition possible for the specific demands of your sport.
Prevent injuries before they happen by preparing your body for the inevitable impacts that come with sliding on snow.
Below is Part 1 of our two part TRX program for skiing and snowboarding that will have you shred-ready in 9-12 weeks.
In weeks 1-3, focus on form and increasing mobility.
In weeks 4-6, add speed, increase tempo of exercises.
In weeks 7-9, emphasize power with explosive movements and increased resistance.
Start with 30 seconds per exercise/side each three-week cycle.
When 30 seconds per exercise becomes manageable, add 15 seconds.
Progress with15 more seconds per exercise as needed.
Complete the following set of exercises as many times as you can in 20 minutes. Start with two days a week and build up to as many as four days per week over the course of nine weeks.
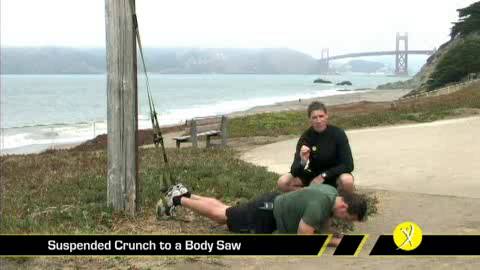
TRX Ski Conditioning Workout - Part 1
Exercise #1: TRX Body Saw (with Crunch) (see above video)
Exercise #2: TRX Pike
Exercise #3: TRX Side Plank (with Taps)
Exercise #4: TRX Overhead Back Extension
Get out there, do Part 1 of the workout and let us know what you think in the Forums. And stay tuned for TRX Ski Conditioning - Part 2.
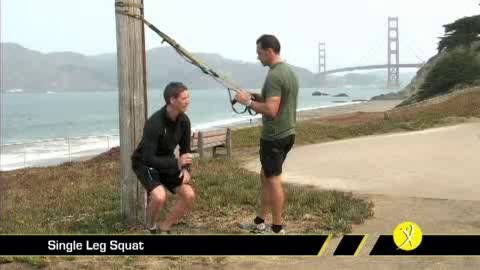
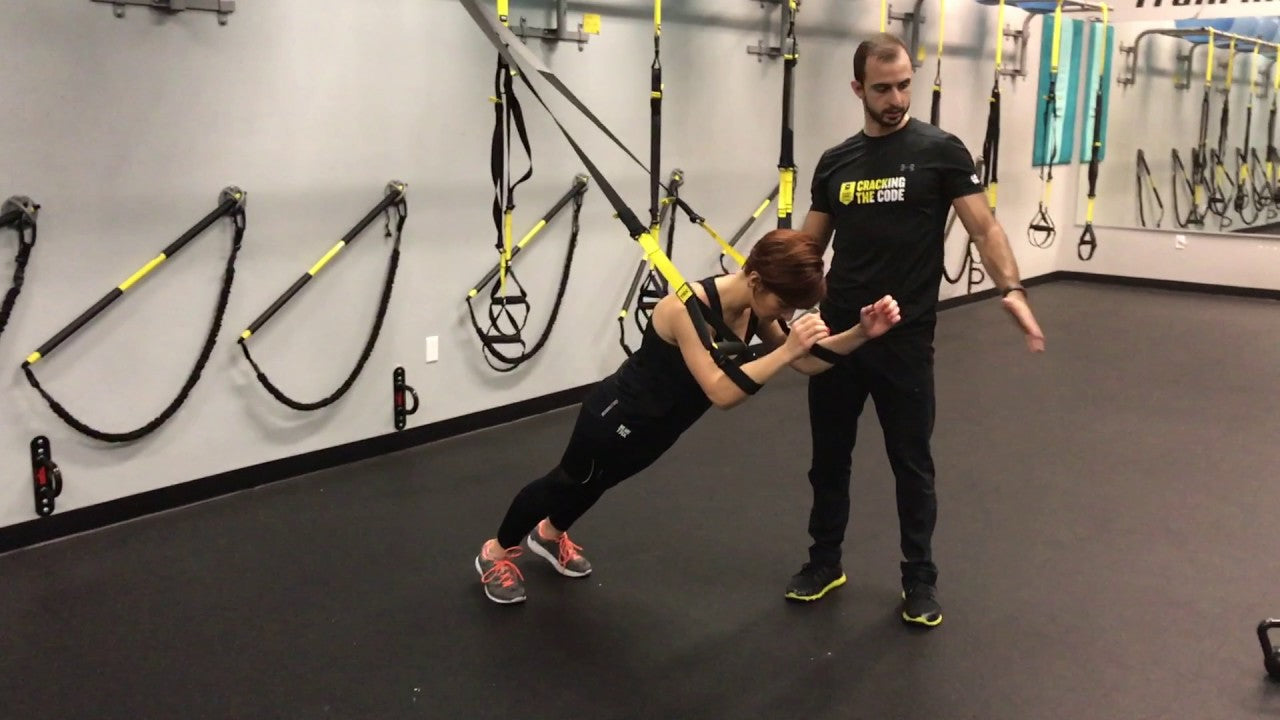
TRX Single-Leg Squat
This movement is the essence of functional, lower-body strength demanding strength, power, stability and balance. Want to find the right progression for your fitness level? Take our quick assessment quiz to get a personalized training plan. Shown here with Fraser Quelch and TRX founder and CEO Randy Hetrick.
TAKE OUR TRAINING QUIZ
Fraser Quelch is Director of Training and Development for TRX. He is also a featured fitness author and a competitive ironman triathlete.
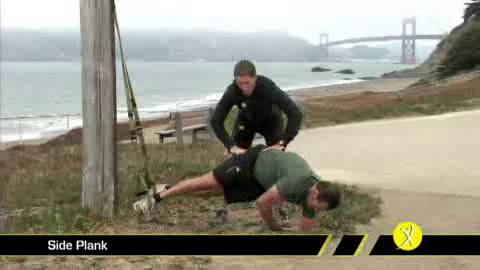
TRX Side Plank
The TRX Side Plank is an incredibly effective and demanding exercise that requires complete core coordination and tremendous strength from the quadratus lumborum and obliques. Want to find the right plank progression for your core strength? Take our quick assessment quiz to get a personalized training plan. You can regress the TRX Side Plank so that it can be used for de-conditioned clients.
TAKE OUR TRAINING QUIZ
Adding hip abduction to the standard TRX Side Plank is a very demanding action that builds hip stability and glute strength and endurance.
Fraser Quelch is Director of Training and Development for TRX. He is also a featured fitness author and a competitive Ironman triathlete.
TRX Shoulder Stability Workout
If your weekend plans include making a trip to your local ballpark to take in America's pastime, pause between bites of that frank to note the number of players on the DL. Want to train like the pros while avoiding common baseball injuries? Take our quick assessment quiz for a customized workout plan designed for ballplayers. Injuries among Major League Baseball players are on the rise, according to recent research published in the American Journal of Sports Medicine.
TAKE OUR TRAINING QUIZ
In the study, pitchers got hurt most often, accounting for 62 percent of all disability days; most of these injuries are to the serratus anterior muscle, an important muscle that:
Helps control shoulder and scapular function by protracting and upwardly rotating the scapula
Assists in stabilizing the scapula against the rib cage, preventing scapular winging
Helps prevent shoulder impingement
As Head Athletic Trainer of the Boston Red Sox and leading expert in the field of physical therapy, Mike Reinold has developed protocols to address injury to the serratus anterior.
While traditional protraction exercises have been effective in strengthening the serratus, Mike cites recent research that has identified that serratus activity is increased when combining both protraction and upward rotation of the scapula. “This movement helps to train the serratus in a functional pattern that combines the muscle’s important role in scapular mobility,” says Mike.
Based on this research, Mike began using a dynamic jab exercise as a baseline for basic training and rehabilitation of the serratus. Since this exercise is quickly mastered, further challenge is required. “Incorporating a closed kinetic chain position and unstable surface training will require a greater degree of dynamic stability of the scapula and promote neuromuscular control,” says Mike. To achieve this, he began incorporating the TRX Suspension Trainer into his rehabilitation programs and created the TRX Serratus Slide.
“The TRX Suspension Trainer is an excellent method of performing the serratus slide exercise that challenges both the strength and stabilizing functions of the serratus muscle,” says Mike. “Furthermore, the amount of challenge can quickly be adjusted by modifying the angle of the exercise.”
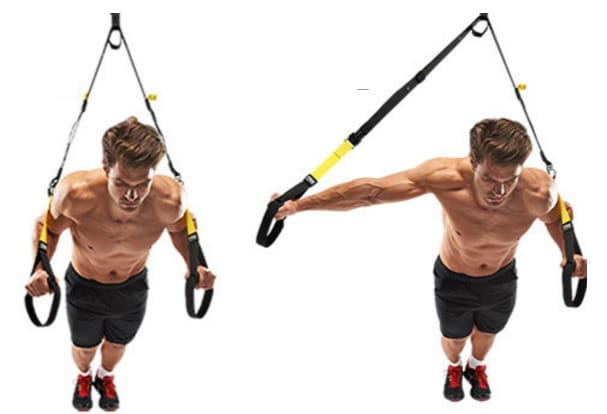
To begin, place your forearms onto the TRX handles or foot cradles (see video above).
Lean forward, keeping your elbows tucked by your sides.
Elevate your arms and round your scapula around your rib cage.
Push out and up until your elbows are close to eye level.
Pause at the top of the movement with your shoulders rounded and slowly return to the start position.
Keeping the serratus anterior muscle strong will not only give clients and athletes a defined chest but also will keep the shoulder joint stable and healthy. Great news if you’re a MLB pitcher… or planning to dominate on the mound at the next corporate softball game.
Mike Reinold is currently the Head of Athletic Training of the Boston Red Sox and a leading expert in the field of physical therapy, athletic training and strength and conditioning. He has published and lectured extensively regarding topics of rehabilitation and sports medicine and shares his thoughts and experience on his website (www.MikeReinold.com).
TRX Shoulder Stability Workout 2
Regaining shoulder stability and eventually strength at end ranges of shoulder motion can be difficult in the rehabilitation process. The TRX Suspension Trainer provides an easy way to progress patients/clients from a stable shoulder position to one requiring a large amount of stability and strength.
Here, Dr. Jennifer Reiner demonstrates her top exercises to regain end range shoulder stability using the Suspension Trainer. Not sure which shoulder exercises are right for your level? Take our quick assessment quiz to get personalized recommendations for your recovery journey. The exercises below begin in the supine position and advance to a kneeling and eventually standing posture while focusing on posture and shoulder integrity.
TAKE OUR TRAINING QUIZ
1. TRX Supine Reciprocal Shoulder Pattern
Begin with the Suspension Trainer fully lengthened and lying on your back with your head under the anchor point. For patients who are unable to achieve full shoulder flexion, simply shorten the strap to a range comfortable for the client. Place one arm above the head in shoulder flexion and the other by the hip in shoulder extension. The arm above should be palm up and the arm below, palm down. Keep the elbows straight and the head relaxed while depressing the shoulder blades. Apply pressure downward into the foot cradles with the backs of the hands.
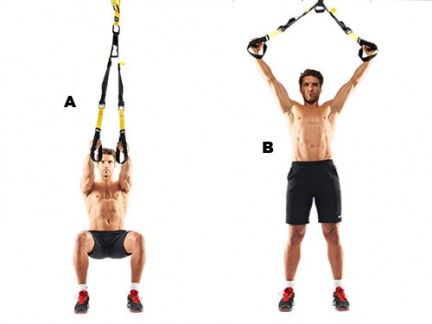
2. TRX Supine Y Deltoid FlyBegin with the Suspension Trainer fully lengthened and lying on your back with your head under the anchor point. For patients who are unable to achieve full shoulder flexion, simply shorten the strap. Place both arms above head in shoulder flexion keeping the elbows straight. Palms should be facing the ceiling, the head relaxed on the ground, and scapulae depressed. Apply downward pressure into the foot cradles with the back of the hands.
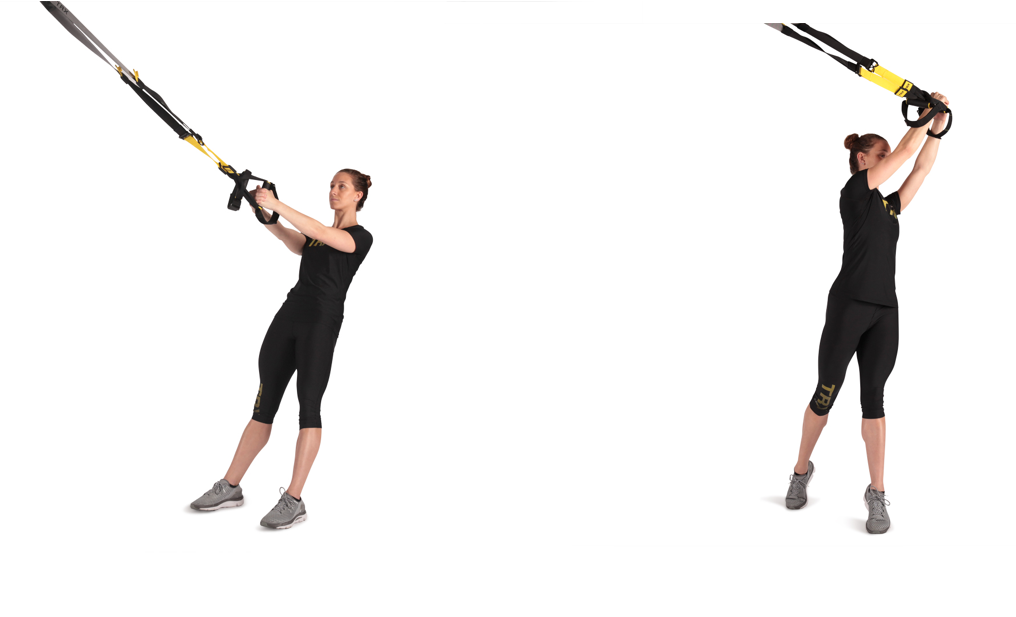
3. TRX Kneeling Y Deltoid FlyBegin with the Suspension Trainer in the mid length position facing your anchor point. Place your arms into a Y position and assume a kneeling posture so that your body is upright with your arms overhead. Slowly lower your body backward maintaining a plank position from your knees to your shoulders. To return, drive your knuckles back keeping your chest up towards the anchor point and your shoulder blades depressed.
4. TRX Y Deltoid FlyPlace the Suspension Trainer in the mid length position and stand facing your anchor point. Set the arms into the Y position and then adopt an offset foot stance. Maintaining a plank position with the arms straight, slowly lower your body backwards. On the return, drive the knuckles back keeping the shoulder blades depressed and the chest up toward the anchor point.
Dr. Jennifer Reiner is the chiropractor for Water and Sports Physical Therapy providing sports rehabilitation services Todd Durkin’s facility, Fitness Quest 10. She is also a TRX Sports Medicine instructor. Dr. Jenn obtained a Bachelor's of Science Degree in Exercise Physiology from the University of Florida and went on to pursue a Doctor of Chiropractic degree from Palmer College of Chiropractic West. As a member of the Palmer West Sports Council, Dr. Reiner focused her studies on sports injuries and rehabilitation.
TRX Rotation and Core Workout
Single-arm and single-leg movements performed on the TRX Suspension Trainer increase your instability, requiring greater total-body muscle recruitment. Want to find the right unilateral exercises for your strength level? Take our quick assessment quiz to get a personalized training plan. In this video, DB Strength founder and MMA coach Doug Balzarini shows you five of his favorite single-arm and single-leg TRX exercises.
1. TRX Single Arm, Single Leg RowSet up as if you were performing a TRX Single Arm Row, but lift one leg off of the ground (the leg of the arm you are pulling with). This will force you to fight rotation and stabilize your entire body through your core. Keep shoulders and hips square to the anchor throughout the entire exercise.
2. TRX Single Arm, Single Leg SquatSimilar to the row listed above, this exercise challenges your ability to resist rotation. Having only one base of support--a single foot--increases the difficulty and forces you to brace your core to maintain stable.
3. TRX Single Arm, Single Leg Balance ReachApplying pressure into the handle with one hand will help to engage your lats (upper back muscles) and core throughout the exercise. Maintain a neutral spine throughout, keep your elevated foot pointed down to the floor and keep your hips squared at all times.
4. TRX Single Arm, Single Leg Side PlankPlace one foot in both foot cradles and rest the other leg on top while you get set up. This exercise can be performed from either the forearm or the hand. Place your top hand on your hip, and keep your shoulders, hips and knees in line.
5. TRX Single Arm, Single Leg High Plank HoldPlace one foot in both foot cradles and get into a plank position. Carefully lift your free leg off the ground and lift the opposite arm.
Doug Balzarini has been in the fitness industry for the past 14 years. He is originally from Massachusetts where he earned his undergraduate degree in exercise physiology and had his first personal training job. He moved to San Diego in 2000 and worked for the American Council on Exercise (ACE) for five years before starting his career at Fitness Quest 10 as a personal trainer and strength coach. He was there from 2005 to 2011 and worked with clients of all ages and abilities. Doug is the strength coach for Alliance MMA in Chula Vista, California and creator of DBStrength.com.Purchase your TRX Suspension Trainer here.
TRX Shoulder Prehab Routine
With March Madness taking center stage in the sports world, we asked the head strength coach for Men’s Basketball at Washington State University, Scott Thom, to explain the importance of preventing injury when the season is on the line. To counter muscular imbalances from the rigors of playing, training and everyday life, Scott uses TRX in his weight room to activate and strengthen muscles often neglected. With stronger muscles, his players are able to correct imbalances, improve their movement patterns, stay injury free and ultimately perform better on the court when it matters most.
My athlete’s world is often dominated by work done in the frontal plane, from playing basketball, to homework on the computer, to a plethora of cell phone texts and social media posts. On a side note, I’ve never seen a selfie taken in the dorsal plane. All joking aside, this can lead to an imbalance in muscular development. It’s not uncommon for my players to show signs of upper cross syndrome, internally rotated shoulders. This muscular imbalance will affect their ability to perform certain exercises and can lead to poor movement patterns and injuries.
As a strength coach, one of my top priorities is keeping my players injury free throughout the season. Basketball is a game where a lot of work takes place overhead from shooting, rebounding, blocking shots and cutting off passing lanes. Want to find the perfect prehab routine for basketball players? Take our quick assessment quiz to get a personalized shoulder stability program. I can help correct these imbalances by incorporating a shoulder prehab routine using the TRX during their pre-lift warm-up. I often call these routines, activation circuits, helping my players understand we are trying to "activate" the areas often ignored in their day to day lives; rhomboids, traps, rear deltoids to name a few. When strengthened, these areas can help correct upper cross syndrome, allowing the athlete to move more efficiently.
TAKE OUR TRAINING QUIZ
The Exercises
1. Press-Ups x10 (TRX Wall Slides)
*Athlete is in an upright position, slightly leaning back to create tension on the TRX, legs are straight, toes point to their nose, athlete presses upward in a military press style.
2. Scapular Rows x10 (TRX Scapular “Js”)
*Athlete positions in an inverted row, arms are straight, scaps protract and retract.
3. Alligators x10 (TRX Split Flys)
*Athlete slightly leans back, arms are straight, using their upper back and rear deltoids they pull the TRX apart by the handles, which moves their body forward, concentric and eccentric portion of the exercise is done at the same tempo.
4. Inverted Row x10 (TRX Low Row)
*Athlete leans back, body stays straight and strong, heels in the ground, toes up, hips and shoulders are in alignment, athlete pulls handles to their sides, while keeping shoulder back.
We will go through this circuit one time before every upper body lift. So, whether you’re a D1 athlete or a weekend warrior, this TRX shoulder prehab routine when done consistently will help strengthen muscular imbalances in your body and prevent injury.
Coach Thom- Create a great day!
Bio:
Scott Thom is wrapping up his second season with the Washington State University men’s basketball program as the team’s strength and conditioning coach/player development, after serving in the same capacity at California the previous four years. Prior to joining the staff at California, Scott coached basketball and taught physical education for seven years at Vintage High School in Napa, Calif. Scott received his bachelor’s degree in physical education from Chico State in 2002, a teaching credential in physical education from Sonoma State, and a masters in Coaching and Athletic Administration from Concordia University. He is certified though both CSCS and USAW. Scott writes articles for STACK and HarbingerFitness.
TRX Shoulder and Back Workout
TRX Training
This video, submitted by educator Nick Tumminello, shows what he calls his 15/30 Workout, guaranteed to exercise the entire upper back and pulling musculature using two TRX staples: the TRX Y Deltoid Fly and the TRX Low Row.
Click here to watch video.
Start with the TRX Y Deltoid Fly to ensure optimal muscular recruitment of the often weak and down-regulated scapular stabilizer muscles (such as the lower traps) throughout the workout. Want to find the right progression for your shoulder strength and stability? Take our quick assessment quiz for a personalized training plan. Also, because the TRX Y Deltoid Fly involves the smaller, weaker muscles, it should be performed first while you are fresh and less likely to compensate due to fatigue.
TAKE OUR TRAINING QUIZ
Coaching Tips:
Maintain body alignment throughout the entire 15/30 workout.
Do not lead with your hips or extend your lower back.
Do not use momentum to lift your body. Keep the movement controlled.
Lift your toes off the ground through the workout to ensure your legs are not taking some of the load.
Keep tension on the TRX while at the top of each exercise. Never allow slack in the TRX straps.
When performing the TRX Y Deltoid Fly, keep shoulders neutral with your thumbs pointing behind you. This minimizes any potential shoulder impingement irritation.
When performing the TRX Low Row, keep your wrists straight and pull far enough to bring your wrists parallel to your ribs.
Try to maintain a proper mind-muscle connection so you can exercise every muscle group, such as the lats.
Progressions and Regressions:
You can quickly adjust the difficulty of both the TRX Y Deltoid Fly and TRX Low Row by moving your feet closer or further away from the anchor point.
For weaker individuals, the rep scheme can be adjusted to 5/10, 10/20.
Always try to progress to the full 15/30 workout protocol.
Perform one to three sets per workout with one to two minute rest in between.
Do your next workout with our TRX equipment:
TRX® PRO4 SYSTEM
BUY NOW
TRX® HOME2 SYSTEM
BUY NOW
TRX® TACTICAL GYM
BUY NOW
Nick Tumminello is the founder of Performance University and inventor of the Core Bar™. He is an international speaker and educator and serves as the performance expert for the Esquerre Fitness Group, where he consults with health clubs throughout the nation. He is a regular contributor to numerous magazines such as Men’s Health and Men’s Fitness along with multiple websites including T-Nation.com, PTontheNET.com, StrengthCoach.com and SportsRehabExpert.com.
TRX Rip Training: Stability Principle
Watch TRX Director of Rip Training, Pete Holman, show you how to develop strength in your core, lower back, lats, shoulders, arms and legs by incorporating the Stability Principle into your Rip Training regimen.
You may remember the Stability Principle from the TRX Principles of Progression. Essentially, the more points of contact your body has with the ground and the wider your base of support, the easier an exercise will be. Think of it in terms of architecture. A building with a wide base and a low center of gravity, like a pyramid, is going to be far more stable and harder to topple than a building with a narrow base and a high center of gravity, like a sky scraper.
If you want to increase the difficulty of any Rip exercise, try turning your pyramid into a skyscraper by narrowing your base of support (bringing you feet closer together), which will force you to stand up taller, moving your center of gravity higher. If your base is less stable, it forces you to recruit more stability from your core. As you can see in the video above, when Jamie brings his feet together to perform a Rip Press, he really needs to engage his core and lower back to achieve the necessary proximal stability for distal mobility.
Purchase your Rip Trainer here!